
What is the project?
For this Maze Game, we will be using various Python libraries to create our own maze game. The objective of the game is to get from one side to another without hitting any wall.
How does the game work?
When the program runs, the user will be prompted a random generated maze which they have to complete by getting across each side. The way you can draw on the maze is by using your mouse and clicking two different points on the maze so it will display a line. Once you have completed the maze the user must rerun the program for a new maze to display on their screen.
Who is this for?
Python Experience: Beginner
Challenge Level: Beginner
Project Goals
In this project, students will have the opportunity to create and design their own puzzle game to enhance their problem solving skills and critical thinking which is a great skill to strengthen. The students will be using various libraries such as turtle, random, and freegames. These libraries will help the students become more comfortable with working other frameworks when completing their own project. Therefore, they can use the fundamentals that they learned from using these frameworks so they can expand on it to create more complex projects.
Also, this is a great way to keep the students engaged because they are creating something they love doing which is gaming.
Educational Achievements
New Concepts Exercise:
Functions
Conditional Statements
Prior Concepts Needed:
Basic Variables
Code To-Do List
- Import our libraries
- Create our python functions draw()and tap()
- Draw maze
- Get Mouse Interaction
Materials and Resources
Materials:
Code Editor: Replit IDE (Integrated Development Environment)
Start Coding Here: Replit IDE
Resources:
In this project, will will be using multiple python libraries to bring this project alive.
Python Libraries being used:
Python turtle
Python random
freegames
What is Turtle Graphics?
Turtle graphics is a popular drawing framework for kids and beginners. In turtle, you can draw anything you desire from various shapes to images. Turtle is a great way to launch the student’s creative minds.
Why do we use Turtle Graphics?
Turtle is a great beginner friendly framework, Turtle syntax is very readable. Also, turtle graphics are very interactive which is great for project based learning.
Implementation
Step 1: Let's organize our code by placing comments
Why do we comment code?
As developers, it is very important to place comments into your code because it makes your code more readable to other programmers. This way when a problem occurs within your code it can be easily spotted because your work is already annotated and there is a description on how each function and/or statement is doing.
- Before we actually start programming let’s title our work.
At the first line in our program, let’s add our Name, Date, and Project Title by using Python comments.
Let’s type:
- Now, let’s section our code into comments to make it organized. There will be three different sections. The first section will be for all the libraries we imported and are using. The second section we will be adding is for our drawing function for our game so we can see our maze display. Lastly we will have to write a comment for our tap function. This function will detect our mouse so it will be able to draw lines.
Let’s type:
Underneath, each comment we will be placing our code.
Step 2: Importing all the Python libraries we will be using
Why do we use libraries in Python?
One of the reasons Python is such a great language to program in is because of the vast variety of Python libraries it offers. Using these great libraries cut off time writing code from scratch because other developers were kind of to make the program libraries so it would be a lot easier for us to make fun cool projects like the Maze game.
- Now, let’s import all the python libraries.
Step 3: Declaring our functions, def draw() and def tap()
The importance of adding functions into our program.
In Python, a function is a group of statements that accompany each other statement. By using functions, we can organize our code into groups and when we need them we can just call them. Using functions also helps us fix common syntax issues which will save you time when finding bugs in our code.
Let’s create our draw function underneath the comment that says “This function will draw our Maze Board”. This function will control all the designs that will shape our maze things like colour, wall sizes, and even the dimension of our maze.
First, let’s declare our function and let’s call it draw.
Now, we have our function declared, we can begin designing our maze. In this step, we have to decide the colour of our maze and how thick you want the walls to be.
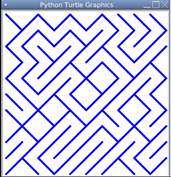
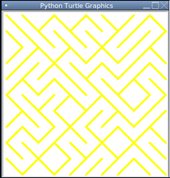
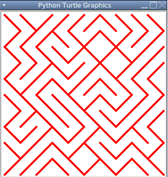
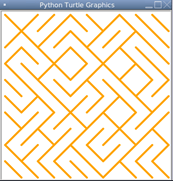
Here are some examples of different colour mazes:
Once we have the colours we have to size the maze, we do this by implementing two different for loops into the function. The first for loop will control the X-axis of the maze and the second one will determine the y axis of the maze. Also, inside the for loops there is an if statement. Using the Python random library this will allow you to generate random maze puzzles.
Now, let’s add our final step for our draw function, which is a statement called update. Update allows us to always have our code updated.
Congrats!!We have finished the draw function!!!
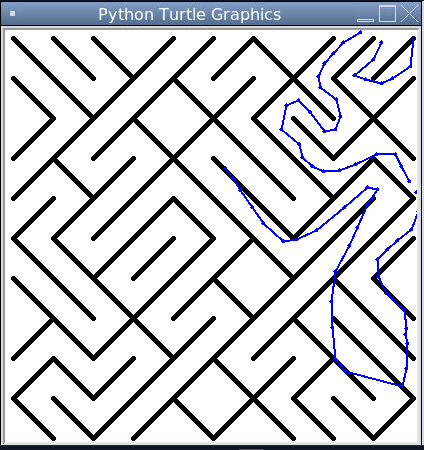
What does the tap function do, you may ask? Well, the tap function is responsible for executing the lines that the user will make to solve the maze.
Here is an example of the output:
First, just like for the draw function we have to declare the function.
Now, since it's declared, how are we going to detect lines and display them? Well we have to implement some logic first. So, we will create a if statement.
What’s happening in this if statement you may ask? Essentially, what is happening is if the mouse is clicked on an area between 0-198, it will draw the line up otherwise it will draw it down down.
Now, let's design our line to our preference. The things we will be designing are the colour, thickness of the like and the size of the dot.
Step 4: Implementing turtle statements
Congrats you are now on your last step before executing your maze game. All we have todo is add the finishing touches to our game. The finishing touches are just the statements that make our game window look so nice and clean.
Setup() is how large our game window is
hideturtle()is for hiding the turtle in the game window
Tracer(False) is for making use of the mouse to remember where the last click was.
draw() is for making sure the game board shows up everytime
onscreenclick(tap) is for making sure the mouse detects the click
done()is for making sure the program finishes and knows when to stop interpreting.
Congratulations, you have completed your project !!!
Private Classes:
This is one of the best ways to learn how to code. One-on-one class sessions make it easy to learn Python or other programming languages and allow students to receive feedback on their work, without having to worry about other students. Private classes allow for better instruction, as lesson plans can be customized for each student, and kids can learn to code at their own pace.
Geekedu offers a wide variety of private Python classes for kids of any skill level, making it easy and fun for kids to learn how to code with Python.


