
Introduction:
Converting between kilograms, grams, pounds, and ounces can be very tricky, especially if you’re not used to using a certain unit of measurement. That’s why in this article we are going to be using Python to create a simple weight converter that will allow you to easily convert these weights into a unit that you will understand. Whether you are new to Python or have some prior experience, this project is a great way to learn more about making functional programs and helps you apply your knowledge in a practical and fun way. Simple and fun projects like this make great beginner Python projects for kids.
Who is this Project For?
This is a beginner-level project for those who are new to Python. At this point, you should already know the basics of creating functions and creating simple GUIs (graphical user interfaces) with Tkinter, and have experience with operators and creating functions using Python. These concepts, along with others such as creating buttons and formatting elements using columns and rows are all concepts that you will use and build upon as you code this project.
What Will We Learn?
This spell checker project focuses on using the Tkinter libraries to create a simple GUI. Throughout the project, you will learn about creating functions and buttons to make a functional project, as well as learn how we can use operators to convert from one unit of measurement to another. This project is a great way for kids to learn how to create simple Python projects, as well as familiarize themselves with libraries, functions, and creating Tkinter GUIs. Additionally, the topics covered in this project can be applied to create a wide variety of other programs with similar applications, such as converting between different temperatures (such as Fahrenheit and Celsius) or calculating exchange rates between different types of currency.
Features to Consider:
- Users can enter their weight in kilograms into the upper text box
- The result in grams, pounds, and ounces will be displayed down below
- The results must be calculated and displayed using floats to avoid losing any values when calculating the results
Main Steps:
This project can be broken down into 3 main steps:
- Import and setup modules
- Create the main Tkinter GUI and labels
- Define the calculate function
Step 1: Import the Modules:
The first step we will need to do is import the Tkinter library. Tkinter is non-native, which means that it is not normally installed on the computer, and therefore needs to be imported. Importing the library will let the program know that we will be using it, and without this step, the program would not run. In order to do this, we will type:
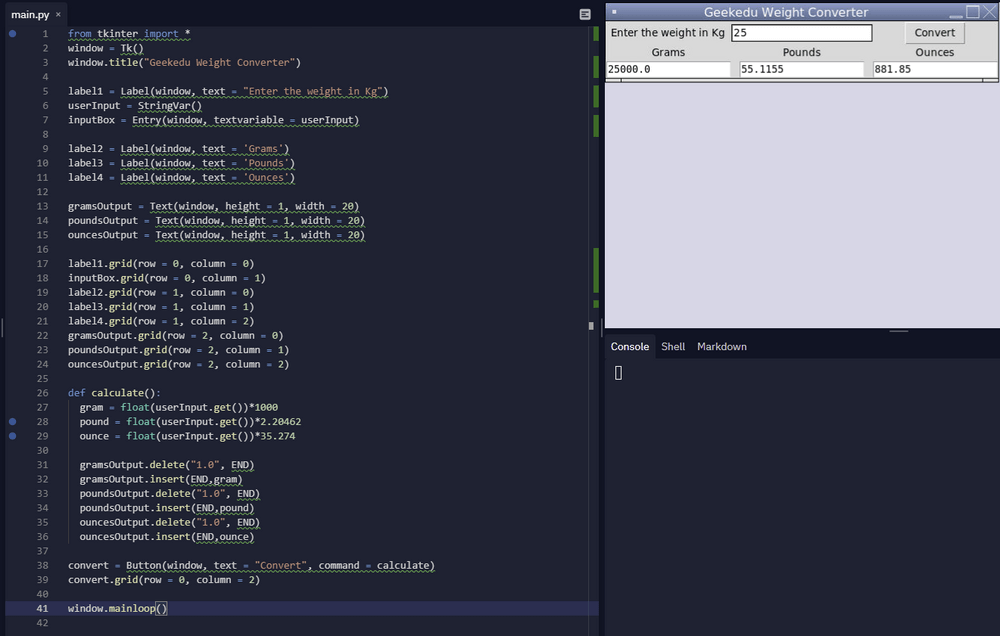
Now that the Tkinter library has been imported, it’s time to create the program’s graphical user interface. This will involve setting up the canvas and titling the window. To begin, we’ll initialize Tkinter and create the window. We will title the window so that users know exactly what it’s called. In this case, we’re titling the window “Geekedu Weight Converter”. This is the name we’ve chosen to use for this example, but you’re free to use whatever name you like. After this is done, the code will be:
Step 2: Create the main Tkinter GUI
Next, it’s time to create labels for the GUI, as well as create the text input boxes. We’ll start by creating a label that tells users where to enter weight in kilograms, as well as a text input box where they can type their input.
Hint: Note that we must create a string variable to store the user’s input, otherwise the program will not be able to take this as input and use it in the calculations.
The code for this step of the project will be:
This will let the user know where they need to input the main measurement before it can be calculated.

Next, we need to position and add labels and text boxes for the results. We will create 3 labels, and three output boxes, one of each for the three results. Each label will be created using a line of code that uses the format: label name = Label(window, text = “insert text here”
Hint: The sections of this command above should be replaced with your own label name and message.
This code should look like this:
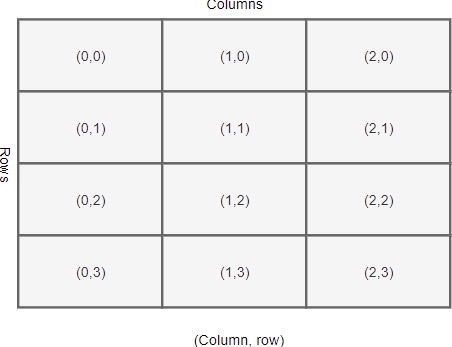
Now that the labels for the GUI are complete, it’s time to format them and arrange the labels and outputs so that they do not overlap one another. This is a very important step in the code because without positioning these elements, the alignment would be off and the GUI would not look clean and user-friendly. For this project, we will be formatting these elements using columns and rows. Each element will be placed in a column and row, which will keep them in line with one another. For example, label 1 and the input box will be in row 0, the result labels will be in row 1, and the results will be displayed in row 2. We will use the same concept to align these elements in columns as well. Once this step is complete, the code will be:
Once this step is complete, the main GUI is finished and it’s time to move on to code the main correction and clear functions of the program.
Step 3: Define the Calculate Function
Now we’ll move on to create a calculate function. This function will be used to convert kilograms to grams, pounds, and ounces before displaying them where the user can see the results. To make this work, we need to start by calculating the weight in each measurement. The code for this section will be:
Hint: For this step, we used values of 1000, 2.20462, and 35.274 to calculate how kilograms convert to other measurements. Feel free to use more or fewer decimals depending on how precise you want your results to be.
Now we need to display these results in the GUI. We will start by deleting any text that may already be in the text box. We will do so using the .delete method. Then, we’ll insert the appropriate values into their respective output boxes. Once this is complete, your code should look like this:
Finally, we just need to create a button to calculate the results, align it on the canvas, and run the main code. We’ll start by creating a button called Convert. This will be done in a similar way to how the labels were created. Then, we’ll use the same rows and columns formatting as was used previously to align the button to the right of the window. At this point, the code for this step will be:
Finally, we just need to add a command to run the main code for the program. The code for this final step is:
And now we’re done!
Project Complete!
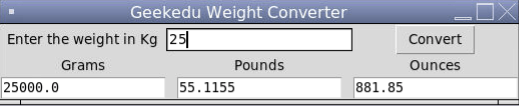
And now the project is complete! At this point, you will be able to input any value in kilograms, and the program will output the results in grams, pounds, and ounces. Now you can use the program to easily convert between units of measurement without confusion. Hopefully, you’ve enjoyed this intermediate Python tutorial for kids, and if you’re stuck on any part of the project or have any issues with your code, try reviewing it again either in your text editor or by looking at the code mentioned above as a reference.
.png)


