
Who is this Project For?
This is an intermediate-level project for those who are new to Scratch. Before beginning, you should already have experience with Scratch. This includes knowing how to create costumes, variables,
if-statements, and use operators. These will be the core concepts used in this project.
What Will We Learn?
This project focuses on using knowledge of Scratch components like if-statements and operators. By the end of the project, you will be able to use these concepts to create a functional calculator.
Features to Consider:
- The calculator should start with an initial value of zero.
- When a button is pressed, that number or operator will be added to the expression.
- When the equal button is pressed the answer will be displayed.
- The calculator should be able to multiply, divide, add, and subtract.
Main Steps:
This project has 5 main steps:
- Create the sprites and backdrop
- Code the number buttons
- Code the operator buttons
- Code the equal button
- Code the backdrop
Step 1: Create the sprites and backdrop
The first thing we’ll need to do is create all the sprites and the backdrop we need for the game. To do this, we’ll make a large rectangle in the center of the canvas, then put a more narrow rectangle near the upper part of the first rectangle. This will serve as the display and is where our numbers and answer will show up. In the end, the backdrop will look like this:
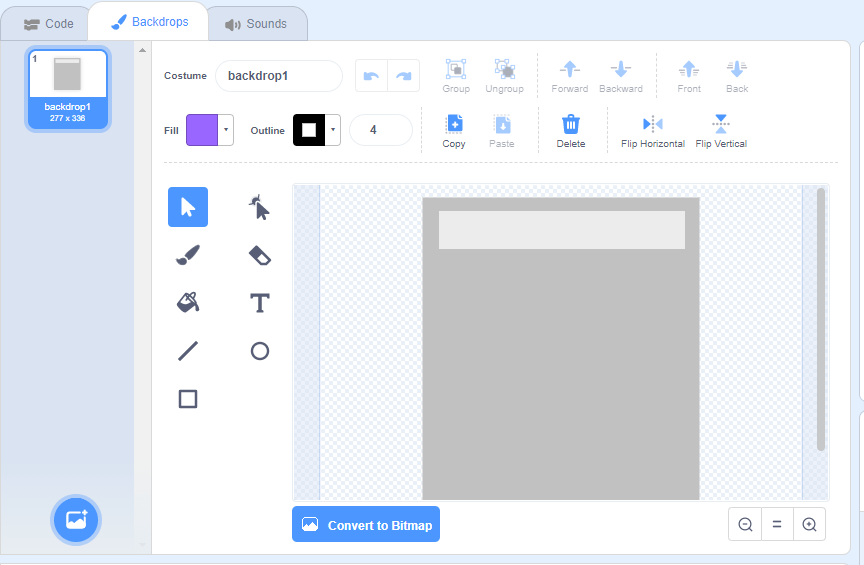
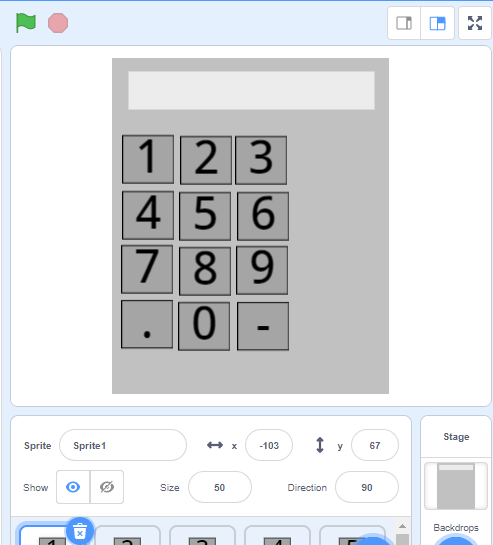
Hint: make the smaller box a different colour so that it’s easy to see and draws attention. Now that the backdrop is finished, it’s time to make the button sprites. We will need to create:
- 12 smaller buttons (these will be numbers 0-9 and the decimal and negative sign)
- 4 larger buttons (for addition, subtraction, multiplication, and division)
- An equal button
- A calculator backdrop
To make the number buttons, create a square and add a text box in the middle. In the text box, type the number or symbol that you want the button to represent. We will do the same thing for the operator buttons, but instead of numbers or symbols, we’ll be typing the operators. The equal sign should be either bigger or a different colour from any of the other buttons so that it’s easy to see.
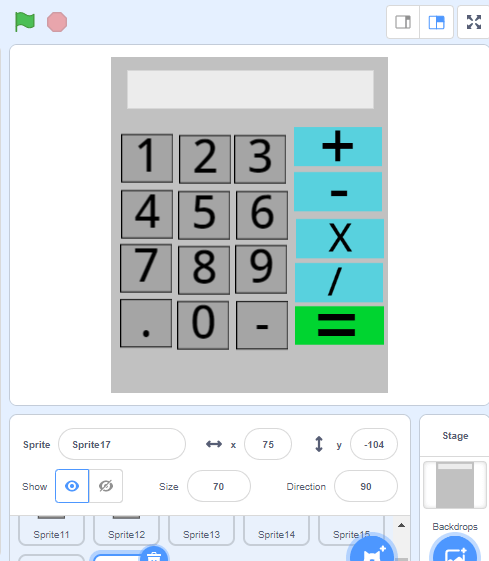
Hint: try making the operator buttons a different colour than the number buttons to make them easier to distinguish. In the end, the buttons should look like this:
Step 2: Code the number buttons
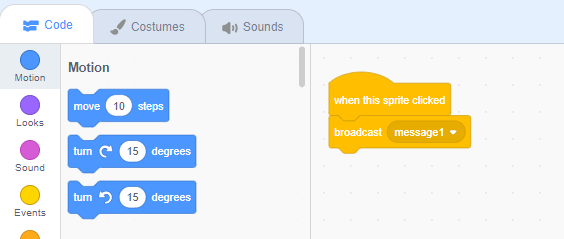
Once we've created our sprites, we can get onto creating the code for each button. The code for each button is very simple and is almost the same for each button. When the button is pressed, we want it to broadcast that it’s been pressed. Todo this, we’ll grab a “when this sprite clicked” block, and drag it out. Next, we’ll grab a broadcast message block and place that underneath. We will need to make a message for each sprite. In this case, each message is called ‘message(number)’.The code should look like this:
We will need to make one of these code blocks for each number sprite. To do this, we’ll put the code block into the 'backpack' and then drag it into the workspace for the next sprite.
Hint: To add something to the backpack, click on the backpack section at the bottom of the screen and drag the code into it. The code is now copied and can be dragged out into the workspace as many times as needed.
Hint: Remember to change the broadcast message for each sprite! Each sprite should broadcast a message that will be used to add its’ value to the expression.
Step 3: Code the operator buttons
Now let’s move on to the four operator buttons. Like the number buttons, these all have the same basic code layout, with one section that corresponds to the specific button. To start, we’ll need to grab a ‘when sprite clicked’ block and create three variables:
- Operation: this will be set to whatever operator button is pressed
- Number: this will be the first number that the user enters into the calculator
- Number 2: this will be the second number that the user enters. It will be inputted after the operator.
Now we need to start by setting our operation variable to whatever operation we want t carry out. In this case, I’m working on the multiplication button. To do this, we’ll choose the block that says “set operation to times”. Next, we need to hide the number variable and show the second number variable. Once we’ve finished that the code should look like this:
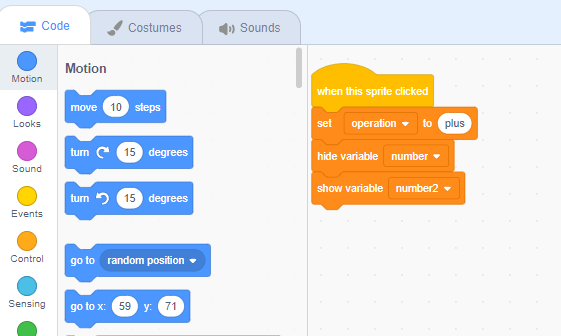
Hint: Like the number buttons we can drag this code block into the backpack and use it for the other three buttons. For the others, set the operation variable to “divide”, “plus”, and “minus”.
Step 4: Code the equal button
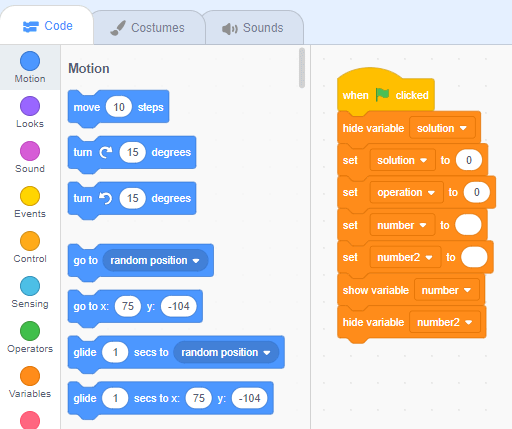
Now that we’ve finished the number and operator buttons, there is only one button left to code: the equal button. We’ll start by creating the code to control what happens when we press the green flag. First, we need to hide the solution variable and set both the operation and solution variables to 0. This will clear the answers on the calculator ‘screen’. We also need to grab two “set variable to” blocks and set numbers 1 and 2 to blank.
Hint: to set a variable to blank, simple leave the white text section of the block empty
Next, we need to show our number variable and hide number 2. This will make sure that when the buttons are pressed to enter the first number only the first number will show up. In the end, the code will look like this:
Now that we’re done with the green flag code, we can move on to define what will happen when the equal sign is pressed. This is the main code that will make the calculator function properly.
To start we’ll grab a “when this sprite clicked” block and underneath we’ll hide our number 2 variable. This will ensure that only the first number is showing. Next, we’ll need to drag out an if-else statement. We’ll start by checking if the operation is equal to “times”. If so, the solution will be set to number x number 2. If not, we’ll grab another if-else statement and check if the operation is equal to “divide”. If it is, the solution is set to number ÷ number 2. We will make the same if-statement to check if the operation is a minus, and if so we’ll set the solution equal to number - number 2. Finally, in the last else, we’ll add a block to set the solution to number 1 + number 2.
Once that’s done, the code will look like this:
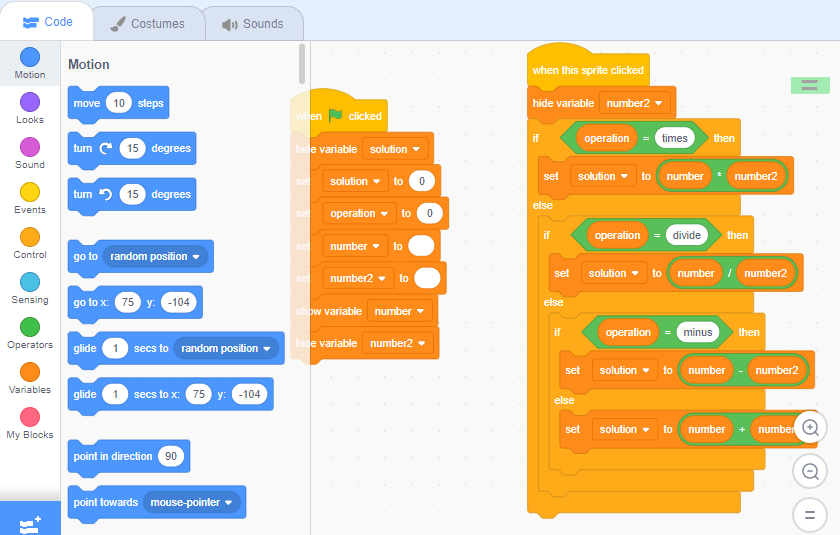
Hint: the addition part of this statement doesn’t need its’ own if-statement. This is because when we get to that point, it’s the only possible option left for the calculator to use.
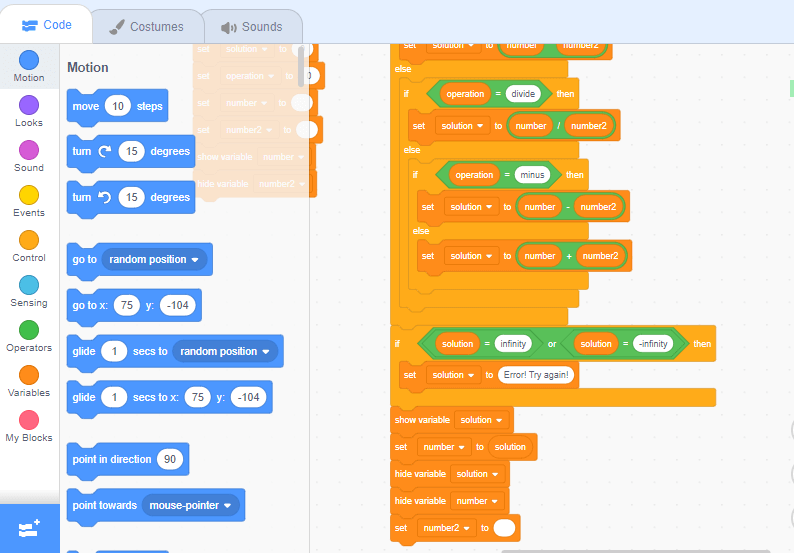
Now we need to add an if-statement to handle any errors that might occur. We’ll start by checking if the solution is equal to infinity or -infinity. If so, the solution variable will display an error message.
Otherwise, the code will move on to the last few commands. Now that we’ve finished all the if-statements it’s time to adjust the variables. We need to show the solution variable, set the number variable to equal the solution variable, and then hide the solution variable again. This will show the correct answer and allow it to be used for the next calculator if needed. Finally, we need to show the number variable and set the number 2 variable to blank again. The code will look like this:
Step 5: Code the background
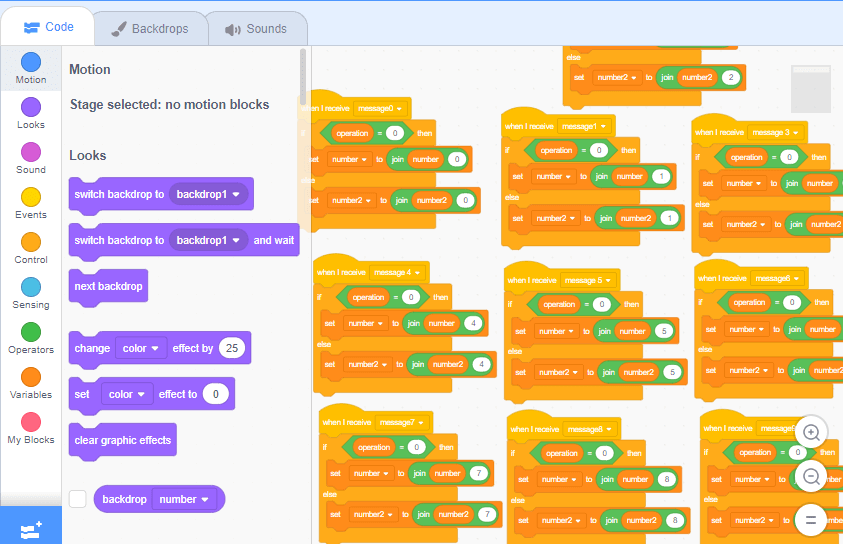
Now that we’ve finished the buttons we only have the backdrop left. Like the buttons, the backdrop has a lot of repetitive code, so after making the first code block we can duplicate it to create the others. Let’s start with the 0 button. We want the code to run when we receive message 0, and then the code should check if the operation is equal to 0. If not, we will set number to “join number 0”. Otherwise, the code will set number 2 to "join number20". The code will look like this:

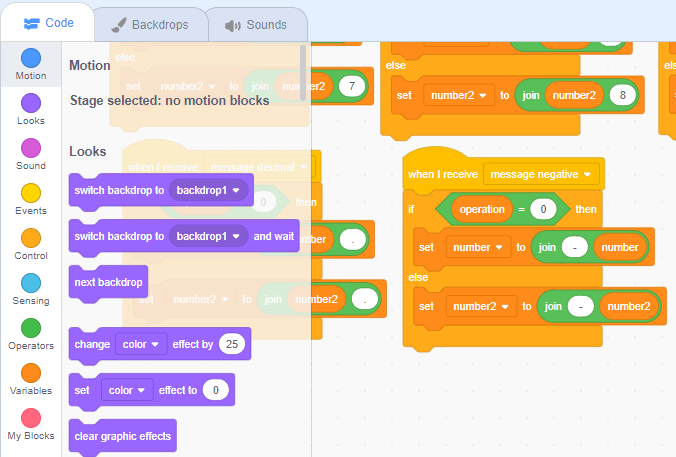
This section of code allows us to input the number pressed into the expression. To make all the other buttons function the same, we’ll duplicate this code block for each button. All we need to change is the message received. For example, button 1 would broadcast message 1, button 2 broadcasts message 2,etc. We will also need to change the number we join to match the rest of the code. This means it will match the number in the message. In the end, the code will look like this:
Hint: the only exception is for the negative sign, where instead of joining number to negative, we’ll be joining negative to number. this will make sure that the negative sign is always shown before the number.
Project Complete!
And now we’re done! Feel free to test your game and see how it works. If you’re stuck or have any issues with your code, try reviewing it to see if you’ve made any mistakes, or check out the code shown above as a reference.
Keep Learning: Scratch Coding for Kids
Geekedu offers Scratch coding for kids that teaches beginners fundamentals in coding by making games. Outside of Scratch, we also teach coding courses for kids 8-18 in a variety of languages like Python, Java, C++, Animation and more.
Check out our online courses for kids, or contact our admissions team to learn which course is best for your student!
.png)


