
Who is this Project For?
This is an advanced-level project for those who are new to Scratch. Before beginning, you should already know how to use operators, broadcasting, and variables. These will be the core concepts used in this project. Although it is not necessary, it would also be helpful to have some knowledge of math concepts such as absolute value, sine, and cosine and how to use them because these concepts will also be used in the project.
What Will We Learn?
This project focuses on using knowledge of Scratch components like operators and if-statements. By the end of the project, you will be able to use these concepts to create a soccer game.
Features to Consider:
- Players can bump the ball and “kick” it towards the nets.
- When a player scores a goal their score will go up.
- After a player scores, all sprites are reset back to their starting positions.
- The ball will only be able to enter the net from the front, not from the sides.
Main Steps:
This project has 4 main steps:
- Create the sprites and backdrop
- Code the player sprites
- Code the goal message
- Code the soccer ball sprite
Step 1: Create the sprites and backdrop
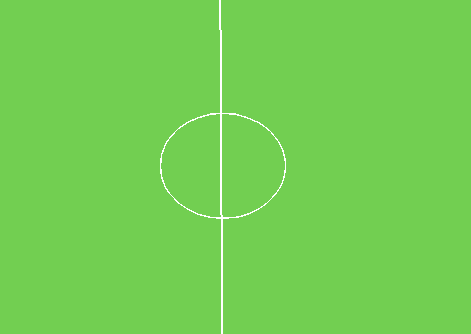
The first thing we’ll need to do is create all the sprites and the backdrop we need for the game. Let’s start by creating the backdrop. For the soccer field we can choose a plain green backdrop, then draw a white line and circle down the middle. After the backdrop is complete it will look like this:
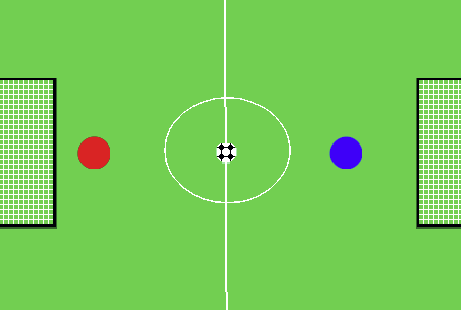
Next, it’s time to create the sprites. In this example, we’ll use two circles to represent the players. Make sure that the players look different from one another to make them easy to identify. Next, choose a sprite to act as the soccer ball. We also need to create some soccer nets. Create these by drawing a box, then filling it in with a grid to act as a net. Because both nets will be the same, we can duplicate this sprite to make the second net. Once completed the sprites and backdrop should look like this:
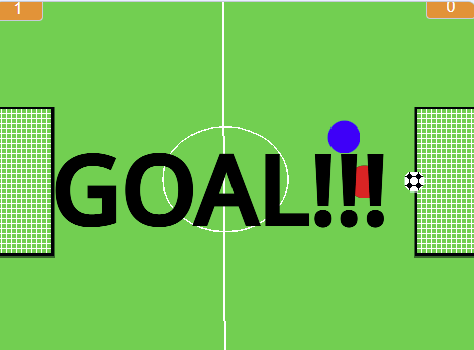
Finally, we need to make our goal sprite. This sprite will be the word “goal” that will show up when a player scores. When shown, it will look like this:
Step 2: Code the player sprites
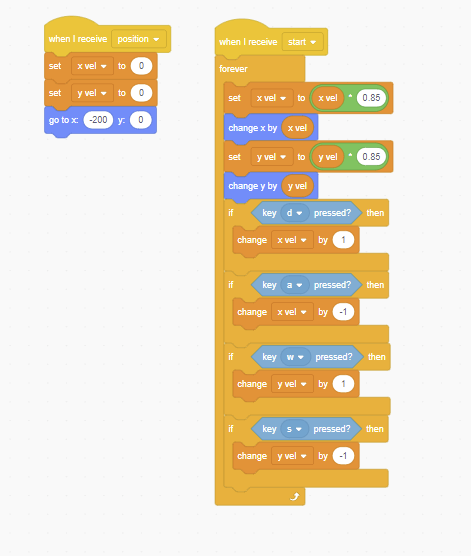
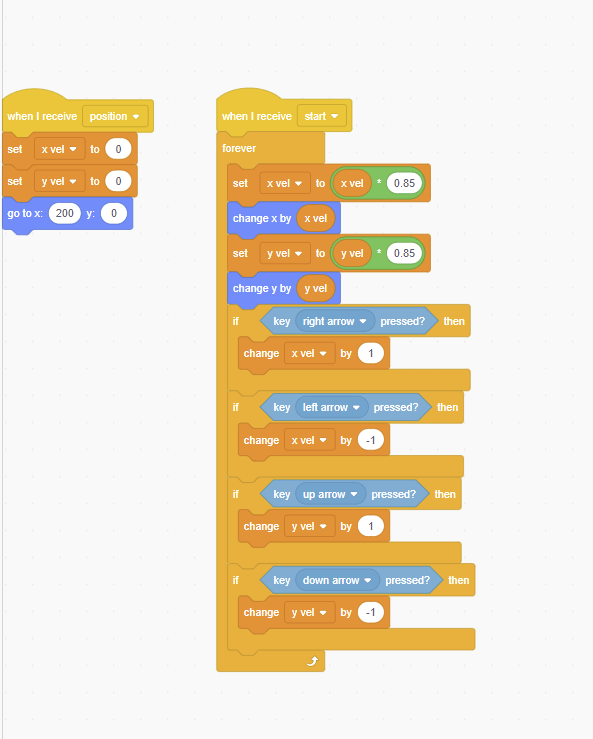
Once we've created our sprites, we can get on to creating the code for each player’s sprite. We will begin by coding the left player. Start by taking a “when I receive” block and create a new message called position. Under this message, create two new variables to represent the player’s velocity in the X and Y directions, and set them both to 0. In this case, the variables are titled “x vel” and “y vel”. These variables will later be used to control the ball’s motion throughout the game. Then, make the sprite go to (-200, 0). This will be the starting point for each ball; 200 pixels away from the center of the field. Next, we will use a “when I receive” block and create a message called “start” and add a forever loop. Now it’s time to add the code that will make the players move. Start by setting the X velocity to itself times 0.85. Then, use a motion block to change x by the x velocity. Hint: You can control the speed that the players move at by changing what the velocity is multiplied by. Higher numbers make the game faster and lower ones slow it down.
Then do the same thing for the y-velocity. Once that’s done it’s time to move on to the key controls. Starry by selecting for if statements and inside each, insert a key pressed block. The first block will check if the D key is pressed, and if so the x velocity will change by 1. The second statement should check if the A key is pressed and will change the x velocity by -1. Do the same thing for the W and S keys. W will change the y velocity by 1 and S changes it by -1. Once complete, the code will be:
Next, we will create similar code for the player on the right. Start by taking the “when I receive position” code from the first player and duplicate it to use for the second player’s code. Then change the -200 to 200to make sure the player appears on the right side of the screen rather than the left.
Hint: To duplicate code from one sprite to another, select the backpack at the bottom of the page and drag the code block inside. Then, you can select the other sprite and drag the code from the backdrop directly into the workspace.
After that is done, duplicate the start code from the first sprite as well. The only differences we will make to this code will be to change the W, A, S, and D keys to the up, left, down, and right keys.
Once complete the code will look like this:
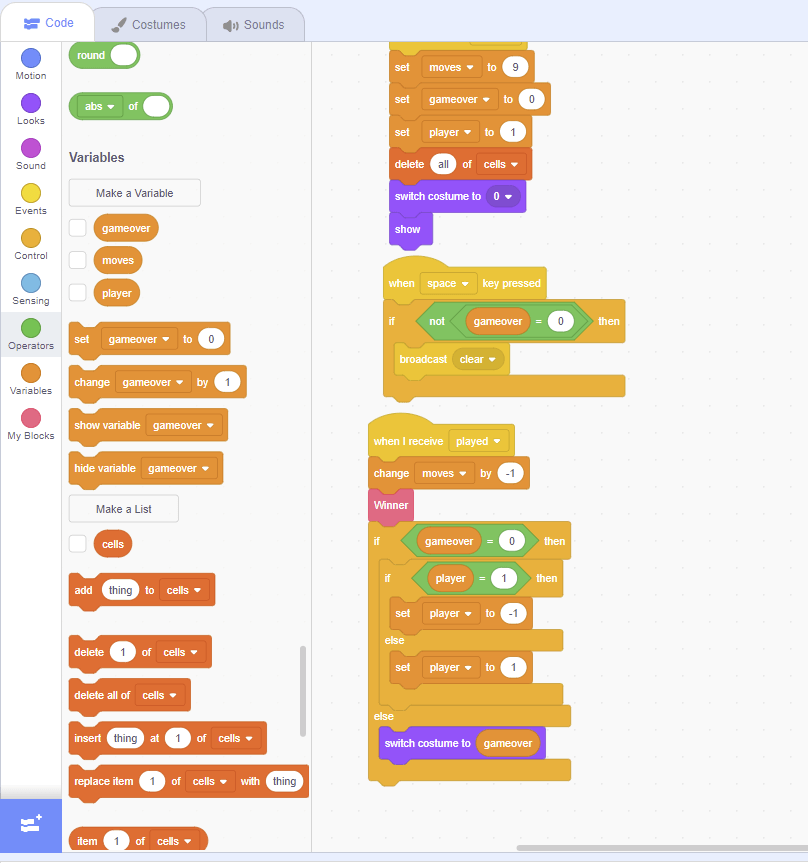
Step 3: Code the goal message
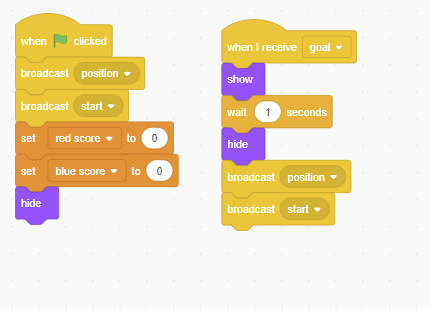
Now that the player sprites have been created, it’s time to create the code for the goal sprite. Start by dragging a green flag block and a “when I receive” block into the workspace. Underneath the green flag block, broadcast the position and start messages. This will cause all the sprites to go to their correct locations as well as reset the players’ x and y velocities. Next, create two new variables to act as scores for each player. In this case, they’re called “red score” and “blue score”. Finally, attach a hide block to the end to make sure that the sprite is hidden when the game first starts. Now it’s time to move on to the “when I receive” block. Start by creating a new message called “goal” that will be broadcasted whenever a goal is scored. Next, add blocks to show the sprite, wait 1 second, then hide it again. Finally, broadcast the position and start messages again to reset all the sprites to their original positions. Once this step is done the code should be:
Step 4: Code the soccer ball sprite
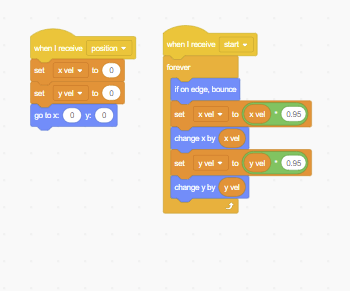
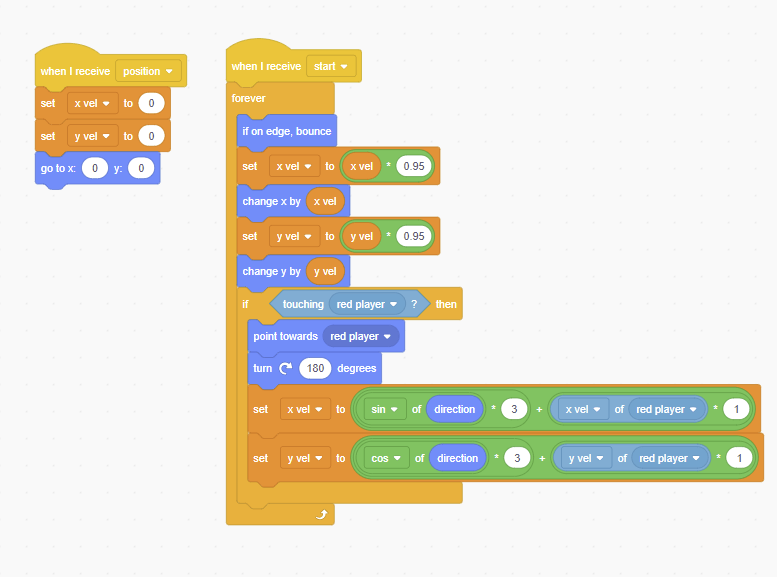
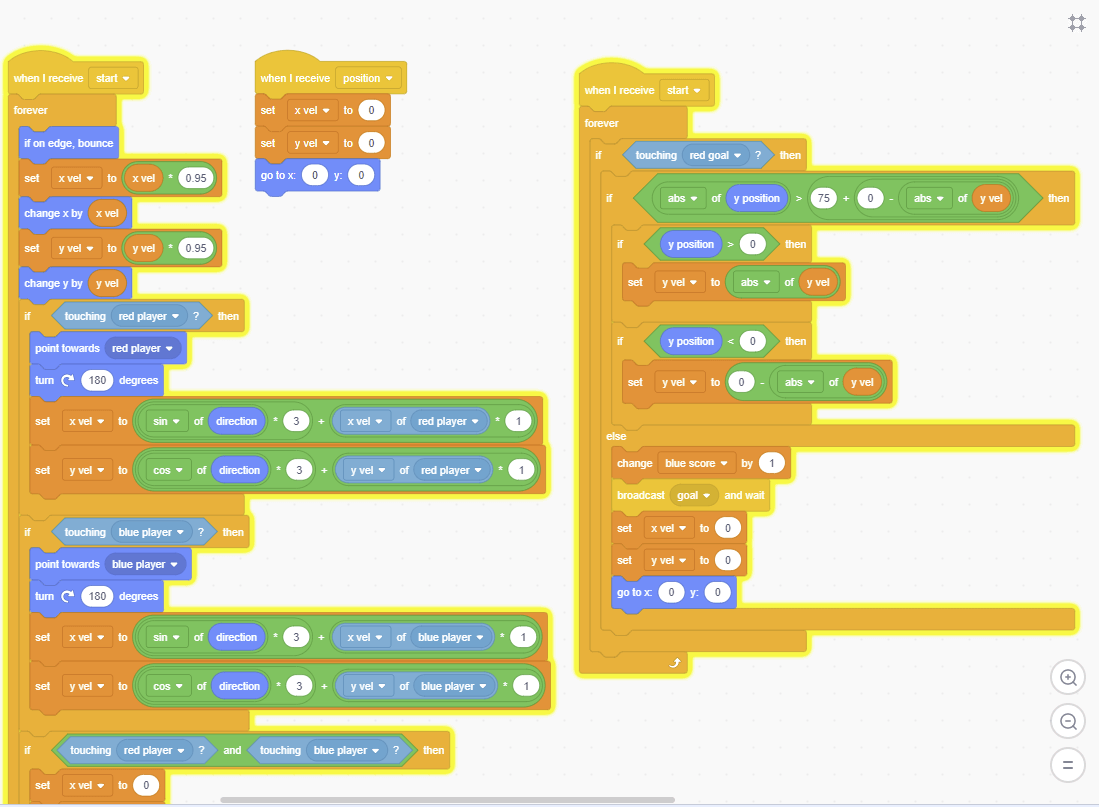
Once the player and goal sprites have been completed we can move on and code the ball sprite. Start by taking a “when I receive position” block and underneath set both the x and y velocities to 0. This will stop the ball from moving until hit by a player. Then, use a “go to “block to set the ball’s starting location to (0, 0). Next, bring out a “when I receive” block and select the start message.
Add a forever loop and an “if on edge bounce” block underneath. This will ensure that the ball stays in view the entire game. Next, set the X velocity to itself multiplied by 0.95 and change the ball’s x position by the x-velocity. Then do the same thing for the y velocity and position. At this point the code will l ok like this:
Next, take an if statement and use it to check if the ball is touching the left player. If so, make the ball point towards the player and turn 180 degrees. This will make sure that it is facing the direction we want it to go. Next set the X velocity to the sine of direction times 3, plus the x velocity of the left player times 1. Although the operation is long it will ensure that the ball is travelling in the correct direction. Then do the same equation for they velocity, except use cosine instead of sine.
After this the completed code will be:
Now it’s time to make the same code for the right player. Do this by duplicating the if-statement we just created but change all of the sections that say “left player” to say “right player” instead.
Hint: In the game shown in these images the player on the left is red and the player on the right is blue. This is why the code mentions red and blue players rather than the left and right players.
Now, create an if-statement to check if the ball is touching the left and right players at the same time. If so, we need to set the V and Y velocities to 0 so that the ball does not move. Once these steps are complete the code should look like this:
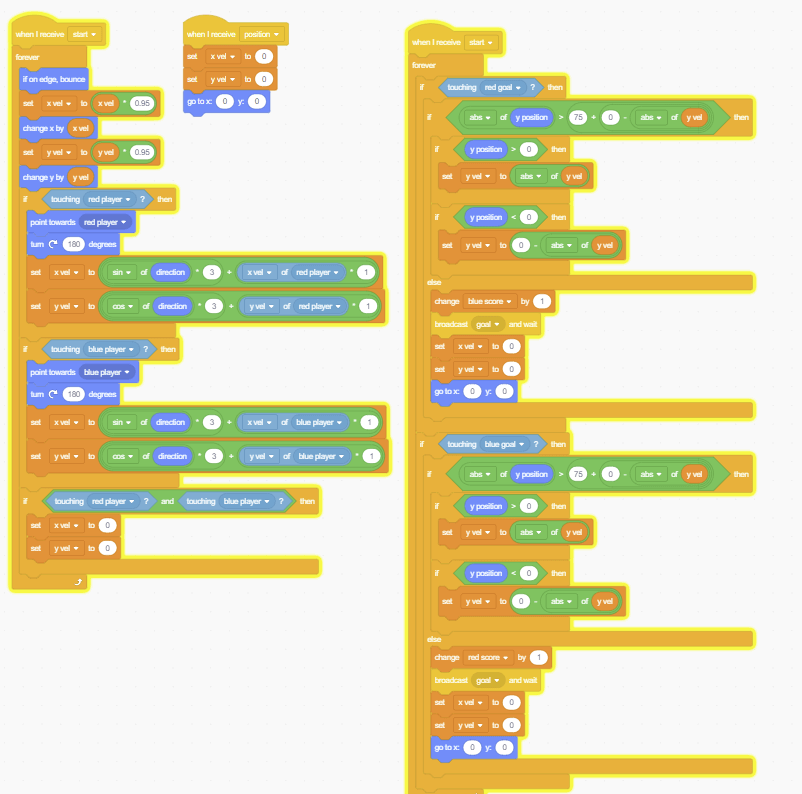
Now it’s time to move on to the final large code block of the project, which will handle scoring goals. Start by dragging out a “when I receive start” block, and underneath add a forever loop with an if statement inside. Make the if-statement check whether the ball is touching the left goal. Then, add in an if-else statement with two smaller if statements inside. The if-else statement will check if the absolute value of the y-position is greater than 75 plus the negative absolute value of the ball’s y-velocity (see image below). In one of the smaller if-statements, check whether the y-position is greater than 0. If so, set the y-velocity variable to the absolute value of itself. In the second if-statement check if the y-velocity is less than 0, and if so, set they-velocity to the negative of its absolute value. Finally, under the else section of the if-else statement, change the right player’s score by 1, then broadcast the goal message and wait. Under this section, add some code blocks to set both the x and y velocities to 0 and return the ball to (0, 0).This will reset the game and prepare for the next round. Once this step is complete the code will be:
Finally, all that’s left to do is make the goal code for the right player. Start by duplicating all of the code that is inside of the forever loop. Place the copied code inside the forever loop, under the code we already completed. Then, simply change the “if touching” statement to check if the ball is touching the right goal and make sure that the left player’s score will increase at the end. After this step is complete, the project is complete and the code should look like this:
Project Complete!
And now we’re done! Feel free to test your game and see how it works. If you’re stuck with any step or have any issues with your code, try reviewing it using the code shown throughout the tutorial to see if you’ve made any mistakes.
Keep Learning: Scratch Coding for Kids
Geekedu offers Scratch coding for kids that teaches beginners fundamentals in coding by making games. Outside of Scratch, we also teach coding courses for kids 8-18 in a variety of languages like Python, Java, C++, Animation and more.
Check out our online courses for kids, or contact our admissions team to learn which course is best for your student!
.png)


