
Introduction:
In this lesson, we are going to be creating a simple music maker program using Scratch. This is a great project for those who already have some Scratch experience and want to try something new and make use of Scratch’s music extension. It will allow players to make press keys or click on sprites in order to make sounds. By combining these sounds, users will be able to make great music and sound effects.
Who is this Project For?
This is a beginner-level project for those who are new to Scratch. Before beginning, you should already know how to use sprite costumes and event blocks. These will be the core concepts used in this project.
What Will We Learn?
This project focuses on using knowledge of Scratch concepts like changing costumes and using event blocks. It will also teach you how to use the music extension to make sounds for games and programs. By the end of the project, you will be able to use these concepts to create a simple yet fun music maker.
Features to Consider:
- Players can press keys to make the instruments make noise.
- Players can also click on instruments to play them.
- There must be a good range of instruments and sounds to work with.
- The instruments must be well-arranged so players can use them all easily.
Main Steps:
This project has 4 main steps:
- Create the sprites
- Code the drum sprites
- Code the piano keys
- Code the trumpet
Step 1: Create the Sprites
Before we can get started writing the code, we will need to create the sprites and their costumes. We will need to create two drum sprites, a trumpet sprite, and 8piano key sprites.
Hint: In this example, we are using 8keys so that players can use them to play a scale. In musical terms, they will have an octave of notes to use.
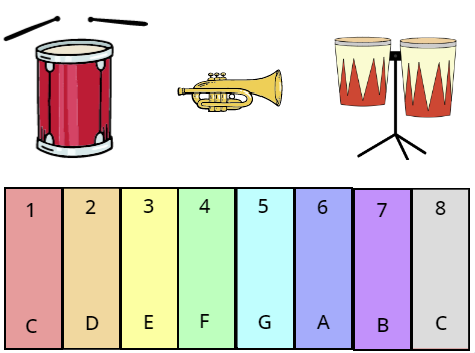
For the drum and trumpet sprites, go to the sprite library and choose whatever sprites you want. For this example, we’re using the drum, conga drum, and trumpet sprites.
.png)
Next, it’s time to make the piano keys. For each key, we will make a rectangle, and on it, we will put the note that the key will represent, and the number key that will be pressed to play the note. Hint: For example, the first not would be C, and the key that needs to be pressed to play the note would be 1, so the costume would look like this:

Make sure to create 2 costumes for each sprite, one with a more muted and dull color, and one with bright colours. This will allow us to quickly alternate between colours when the sprite is clicked on to make it look like the key was pressed. Once all of the sprites are complete, arrange them on the canvas, and afterward, it should look like this:
Step 2: Code the Drum Sprites
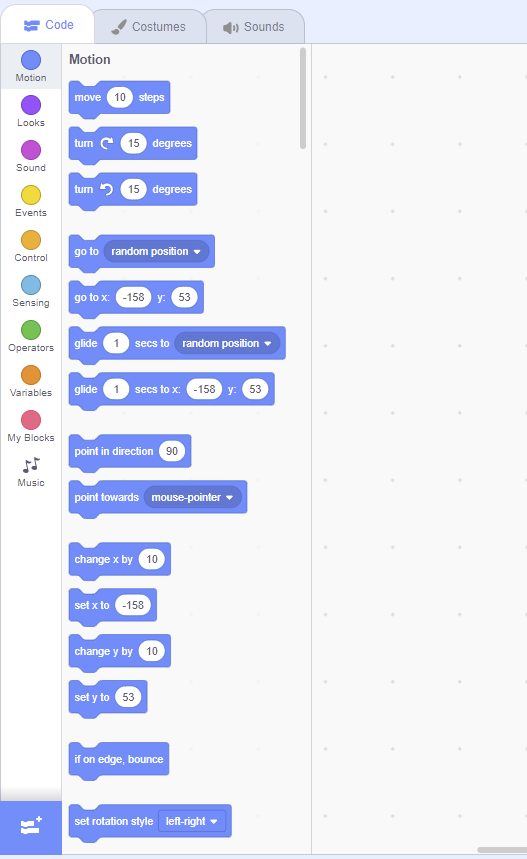
Once the sprites have been completed, it’s time to code them! We’ll start by coding the drum sprites. Begin by adding the music extension to the project by going down to the “Add Extension” button at the bottom of the code list.
Select the music extension and then it’s time to begin. Start by selecting a “When this sprite clicked” block. Underneath, we will switch the costume to the second costume for the sprite (In this case it’s “drum-b”. Next, go to the music section and select the play drum block. Select the drum sound you like the most, and set the block so that it plays the sound for 0.25 beats.
Hint: Changing how long the sound plays for will affect the music you can make. Try experimenting with longer or shorter times to see what you prefer.
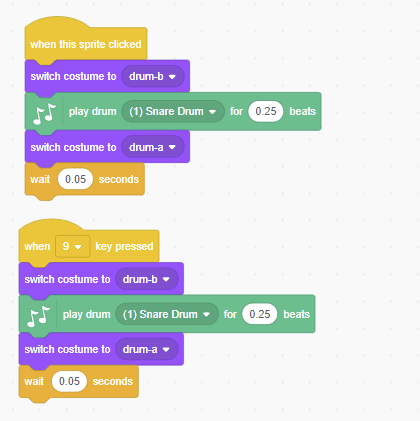
In this case, we have used the first snare drum sound. Once the sound is chosen, change the costume back to the first one (in this example it’s “drum-a”), and add a wait block at the end. The wait time will be set to 0.05 seconds, which will allow the drum to play many times in a row without having the beats blend into one another. Now it’s time to make the code for when a button is pressed to play the drums. In this case, the 9 key plays the snare drums, so we will start by selecting a “When 9 key pressed” block from the events section. Underneath, we will insert the same code we used for the previous code block.
Hint: You can duplicate a section of code by right-clicking on it and selecting duplicate. This will let you re-make sections of code quickly and efficiently.
To create the code for the second set of drums, use the same code except change the sound produced. In this case, we’re using the conga drum sound for the second set of drums.
Once these steps are complete, the code should look like this:
Step 3: Code the Piano Keys
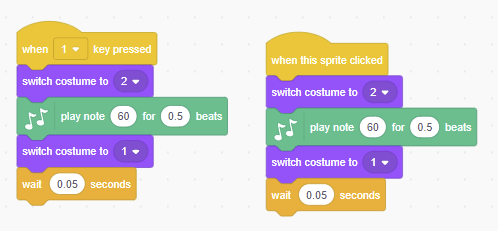
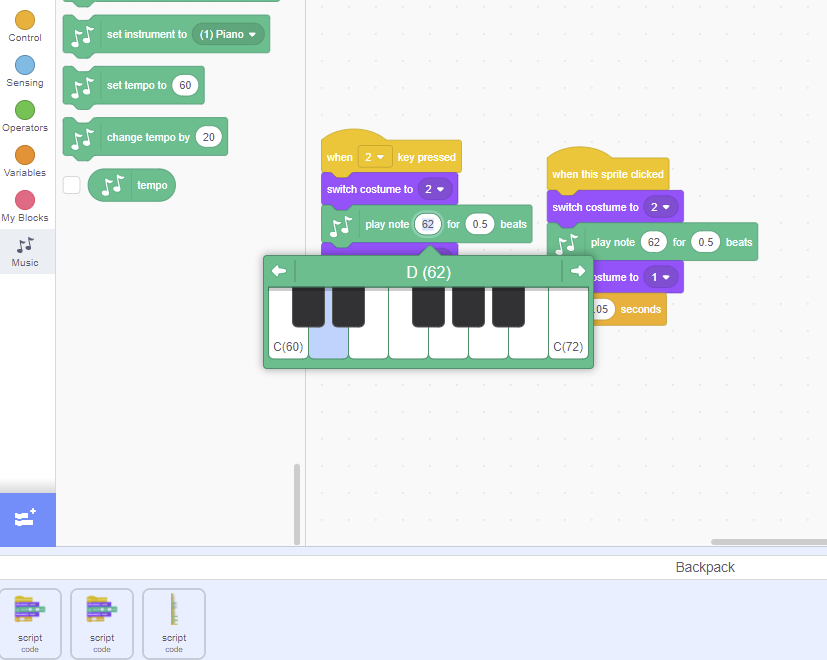
The next step is to code the piano keys. Each key uses the same simple code, with slight differences in the note that is played. Start by selecting a “When key pressed” block, and selecting the 1 key.
Underneath this block, we will change the sprite’s costume to costume 2, to make it look like the key has been pressed down. Much like with the drums, the next step is to use a sound from the music extension. For the piano keys, we will use the “play note” block, to play the note for 0.5 beats. Then, select the note you want the piano to start at. In this example, we’re using C(60).
Hint: Make sure that the note you select and the key that is pressed at the beginning of the code match up with the sprite’s costume!
Next, we’ll change the costume back to costume 1, add await block to make the code pause for
0.05 seconds, and this step of the code is complete! Now it’s time to do the same steps to create the code for when the sprite is clicked. Like with the drums, you can duplicate the code and add it underneath a “When this sprite clicked” block to complete the code. Once this step is complete, the code should look like this:
To code the rest of the keys, you can copy the code over to the next sprite by adding it to the Scratch backpack. To do this, click on the backpack label at the bottom of the screen, and drag a code block into it. The backpack allows you to copy code segments into other sprites much more easily and efficiently.
Hint: When coding the other keys, make sure to change the key that is pressed to trigger the code, as well as the note that is played. Forgetting to do this will mean your piano doesn’t work properly!
Step 4: Code the Trumpet
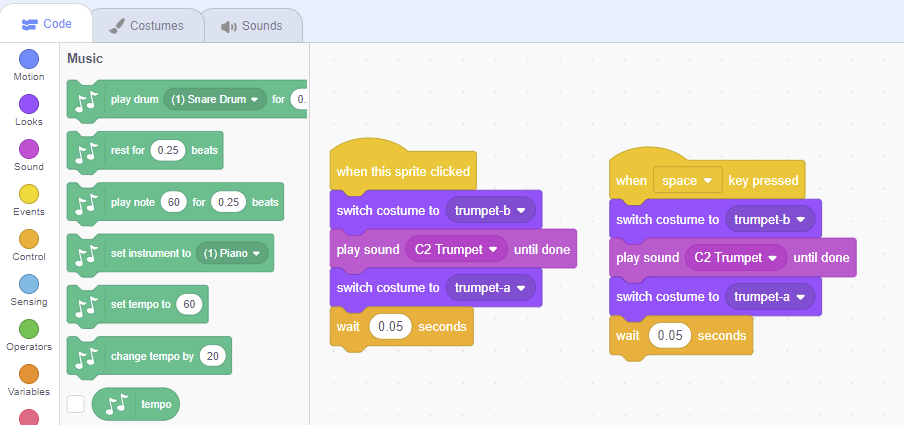
Finally, once all of the piano keys are done, it’s time to code the trumpet sprite. It uses the same basic code as the drums or the piano, except the sound played comes from the sound section rather than the music extension. Like the previous sprites, start by selecting a “When this sprite clicked” block, and change the sprite’s costume to costume 2. Then, select the “play sound until done” block from the sound section.
We use the “play until complete” block rather than just the play block in order to prevent sounds from overlapping. With the play block the sound would interrupt itself and start over, but with the “play until complete” block, the sound will finish playing before repeating itself again. Once this is done, we can choose what sound we want to play. In this example, we’ve selected the C2 trumpet sound, but you are free to choose whatever sound you’d like for your project. Finally, we’ll change the costume back to the original costume 1 and wait 0.05 seconds to prevent overlapping the sounds. Now that this step is done, feel free to duplicate the code and add it under a “When key pressed” block just like before so that the trumpet plays when a specific key is pressed. Once this step is complete, the project is done and the code should look like this:
Project Complete!
And now we’re done! If you’re stuck with any steps or have any issues with your code, try reviewing it using the code shown throughout the article to see if you’ve made any mistakes. Feel free to test your music maker and see how it works. Try creating different types of music and sound effects, or try out different instruments entirely, there is no limit to what you can create!
.png)


