
Introduction:
In this article, we are going to be using Python and the Tkinter library to make a simple and functional Address book with a Graphical User Interface (GUI).

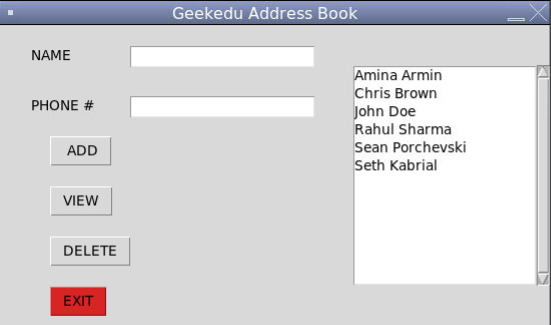
Tkinter Address Book
This project is a great way to learn more about making functional programs by creating a useful and fun program. Through completing this project, you will learn more about programming and creating user-friendly apps and programs. It’s a great way to build both your creative thinking and problem-solving skills while making a functional computer program.
Who is this Project For?
This is a beginner-level project for those who are new to Python, or those who want a fun way to apply their coding skills. Before starting this project, you should have some experience using lists and creating functions, as well as have some experience using Tkinter as these are the concepts that you will use and build upon as you code this project.
What Will We Learn?
This program focuses on creating a GUI using the Tkinter library, which is used to display the contacts and their contact information. Functions are also heavily used to add functionality to the program and to allow users to interact with the app by using the program’s buttons. These concepts are essential for any programmer to understand, and can be applied to any Python project.
Features to Consider:
- Users will see a list of their contacts (The program will start with some pre-set values)
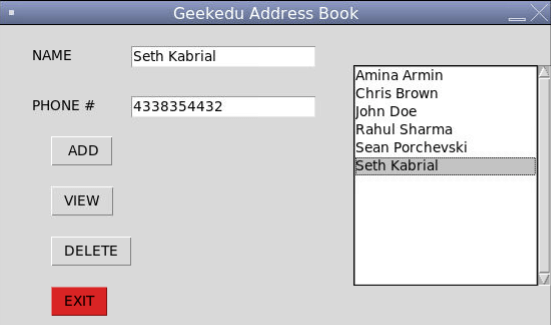
- By selecting a name and clicking the view button, users can see that person’s information
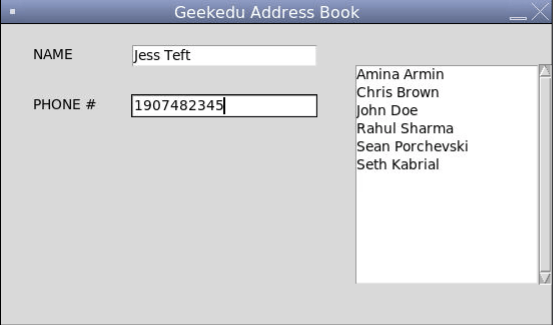
- Users can add new contacts by entering in information and then clicking the “add” button
- Users can delete contacts by selecting a name and then pressing the “delete” button
Pseudo Code:
Below is the pseudocode for this game:
Import Tkinter
Set up the Tkinter window with dimensions of 550x300 pixels
Set the window title
Create a list called contactList and add some names and their associated phone numbers
Create a string variable called name to store a contact’s name
Create a string variable called number to store a contact’s phone number
Create a scrollbar, orient it vertically and align it to the right of the screen
Create a listbox to store values, and orient it to the right of the screen
Function selected():
Return the selected values
Function addContact():
Append the given name and phone number to the contact list
Call the selectSet() function
Function delete();
Delete the selected contact
Call the selectSet() function
Function view():
Select the name and phone number of the user’s selected contact
Set the name field equal to the selected contact’s name
Set the phone number field equal to the selected contact’s phone number
Function exit()
Destroy the window to exit the program
Function selectSet():
Sort the contact list
For name in contactList:
Display the contact
Call the selectSet() function
Create a label with the text “name” and place it at (30, 20)
Create an entry with the textvariable “name”, and place it at (130, 20)
Create a label with the text “phone #” and place it at (30, 70)
Create an entry with the textvariable “number”, and place it at (130, 70)
Create a button with the text “add” and the command add()
Place the add button at (50, 110)
Create a button with the text “delete” and the command delete()
Place the add button at (50, 210)
Create a button with the text “view” and the command view()
Place the add button at (50, 160)
Create a button with the text “exit” and the command exit()
Place the add button at (50, 260)
Run the mainloop
Main Steps:
This project can be broken down into 4 main steps:
- Import libraries and set up the window
- Set up variables the contacts list
- Create the button functions
- Create the main GUI
Step 1: Import Libraries and Set Up the Window
The first thing we’ll need to do when creating this game is import the required libraries. For this program, we will be using the Tkinter library to create the GUI, and we can import it using this code:
Next, we need to set up the window. This includes setting a title and choosing the size of the window (for this example the window is 550x300). We will also make it so that the window can not be resized (to keep all of the components properly aligned) and set a title for the window. This will be done like so:
Step 2: Setup Variables and the Contact List
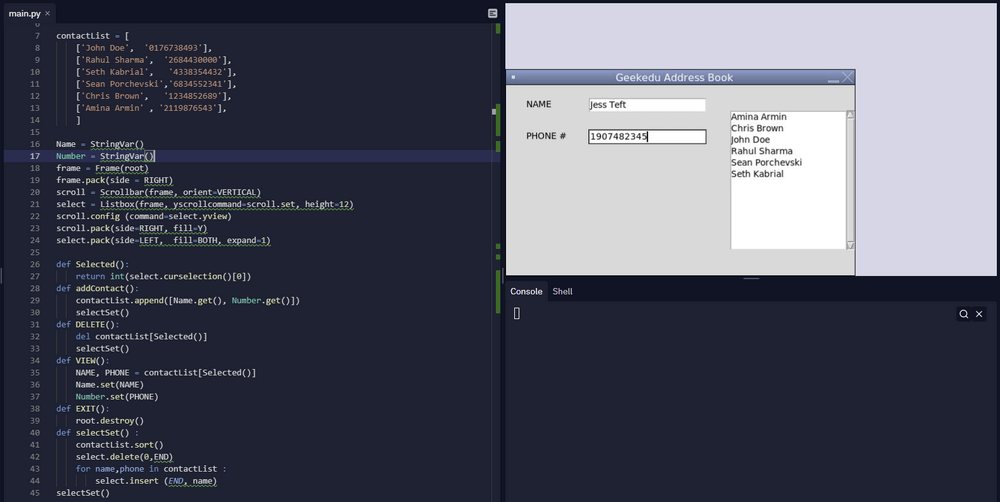
Next, we need to set up some of the variables that will be used in this project, as well as create some initial values for the contacts chart. First, we need to create a list called contactList. Then, we will add a series of names and their associated phone numbers (for this example, we’re adding 6). Then, we will create string variables to store values for each contact’s name and phone number. The code will look like this:
Next, we need to create a frame to display the contact list in, like so:
As you can see, we started by creating a frame and using the pack() method to align it to the right side of the window. Then, we created a listbox and scrollbar for this window. Both of these were also aligned to the right.
Once this is done, it’s time to move on to the program’s other functions
Step 3: Create the Button Functions
Now that we have finished creating the contacts list and the frame that they will be displayed in, it’s time to program the functions for the GUI’s buttons. In this project, we will have four buttons: add, delete, view, and exit.
You’ll notice that these functions are quite similar to one another, so once you create one, the rest should be fairly simple. Here is the code for this step:
You may notice that each of these functions works by selecting the contact that the user selects, and then modifying it, whether that be by deleting it, adding it, or displaying the information. The exit function simply exits the window and the selectSet formats the names and allows users to select them.
Note: Some of the functions have been named using all uppercase letters (such as EXIT or DELETE). This is because there are some pre-made methods that use these commands but do not perform the actions that we want, so we create some with all uppercase letters to allow the program to differentiate between the two.
Step 4: Create the Main GUI
Finally, we’re on to the last step, which will include creating buttons and labels for the GUI, as well as running the mainloop. We’ll start by creating labels to let the user know where to enter a contact’s name and phone number. Beside each label, we will also include an entry box where they can type in names and phone numbers to be stored as variables in the program.
Now that the labels are complete, it’s time to move on and create the buttons:
As you can see, each button is defined with a name, and then we need to set what the text on the button is, as well as what command will be run when the button is pressed. Make sure that each button calls the correct function! Once each button has been completed and we have called the mainloop to make sure that the program runs, the project is done!
Project Complete!
Now the project is complete! We hope that you’ve enjoyed this article and tutorial to teach you how to create a simple address book program using Python. Make sure to run your code to test it out, and make sure to double-check the code above as a reference to help fix any errors.
.png)


