
Introduction:
In this lesson, we are going to be creating a program to convert written text to audio files, which makes research easier and will allow you to absorb more information in a shorter time period. Whether you are new to Python or have some prior experience, this project is a great way to learn more about making games and apply your knowledge in a practical and fun way.
Who is this Project For?
This is an intermediate-level project for those who are new to Python. At this point, you should already know the basics of creating functions, installing packages, and creating simple GUIs (graphical user interfaces) with Tkinter. These are the concepts that you will use and build upon as you code this project. That is the use of Artificial Intelligence in Python.
What Will We Learn?
This project focuses on using the Tkinter, gTTS, and playsound libraries to convert the text to an audio file. All users will do is type their message into the text box, and the program will convert it to audio. This is a relatively simple project that has a wide variety of uses, so let’s get started!
Features to Consider:
- The GUI must include a text box where the user can input their message.
- The audio file must be saved as a separate file so that users can access it later.
- The file and GUI should be named in a clear and concise way.
%20(1).png)
Main Steps:
This project can be broken down into 4 main steps:
- Import the modules
- Create the Tkinter GUI
- Define the main functions
- Create the GUI’s buttons
Step 1: Import the Modules:
The first thing we’ll need to do to begin the project is import all of the libraries and modules that we’ll be using. We will use the Tkinter library for the graphics, and the gTTS and playsound libraries to convert the text to audio. First, you’ll need to install them. You can do this using the command line to install the packages needed to create this program. To do this, you will type:
Next, we’ll import the libraries we need. To do this, we’ll type:
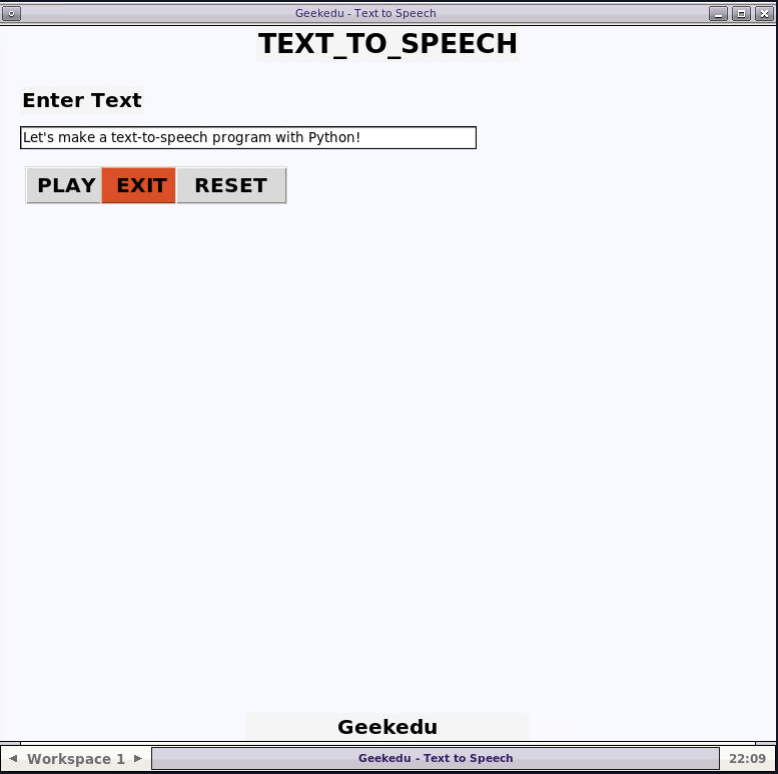
Step 2: Create the Tkinter GUI
Now that all of the modules have been imported, it’s time to create the program’s graphical user interface. First, we’ll add a line of code to initialize Tkinter, then we’ll use the geometry.root command to specify the dimensions of the window.
Hint: You can set the dimensions to whatever you’d like, just make sure that the buttons and other components will fit inside.
Then, we’ll set the background colour. For this example we’re using “ghost white” but you’re free to use whatever colour you like. Finally, we’ll title the window so that it’s clear what the purpose is. Once this step is complete, the code will look like this:
Now we need to create labels and graphics for the window, as well as the text box where the player can enter the message. The code for this step is:
Hint: Note that the font, size of text, and message can be adjusted according to how you want the project to look. Make sure that the text is aligned by using the .place command to set specific X and Y coordinates.
Step 3: Define the Main Functions
Next, it’s time to create the three main functions that will make up the main part of the program. The first function– Text_to_speech – will take the message as input and create the audio file as output. The Exit function will end all running code and stop the program, and the reset function will clear the message and allow the user to enter a new one. To make the first function, we’ll define the function, then create a variable called message and set it to entry_field.get. This means that the message will take input from the text box that users type their message in. Then, we’ll use the gTTS module to create a variable called speech and use it to convert the message text to audio. Finally, the audio file will be created and saved. By the end of this step, the code should look like this:
Now we’ll code the exit and reset functions. Stary by defining the exit function, and on the next line, we’ll simply use the root.destroy() command to stop the GUI and end the program. The reset function will be similar, all that we need to do is set the Msg variable to an empty string. The finished functions will have this code:
Step 4: Create the GUI’s Buttons
Finally, we just need to create three buttons: Play, Exit, and Reset. These buttons will be used to control what the program does after a message is inputted. The buttons follow a very similar format to the text, and we will be able to set the font size, formatting, colour, and location. For example, the code for the play button is:
Hint: Note that a portion of this line of code says “command =”. This section simply lets the program know which function to run when the button is pressed. In this case, we’re using the Text_to_speech function.
Once the first button is complete, it’s simple to code the others. Feel free to change the formatting, colour, or location of these buttons as well to make the GUI more visually appealing. For example, we’ve decided to color the exit button red to make it stand out.
Finally, there’s only one line of code left, and it’s the line that will run the entire program. To do this, simply type:
Project Complete!
And now we’re done! Feel free to test your code now and see how it works. If you’re stuck or have any issues with your code, try reviewing it again either in your text editor or by looking at the code mentioned above as a reference. Want to learn more? Coding for kids
.png)


